
March 11, 2024
Is Vue Storefront 1 still usable?
The Hyvä React Checkout is one of the nicest open source things the Hyvä team has developed in recent years. As mentioned in the readme, it’s not a ready-to-use module, but rather a fast and flexible tool to build a custom Checkout for Magento2.
What I absolutely love about this Checkout is that it’s like a blank canvas where you can develop anything. The architecture is solid, the outcome is up to you.
The mechanism for integrating all payment methods you need is simple and ingenious: they just work.
All payment methods valid for the quote are returned in the cart graphQL call and shown as radio button options. The customer can select one of them and place the order.
This is not enough for most payment methods that need a customized interface to collect user information, to redirect to the payment client page or to complete the order. For this reason Hyvä React Checkout allows us to override a payment method option with a custom render component.
Build a new payment method
The Hyvä community has already developed several modules for common payment methods (PayPal, Amazon Pay, Stripe, Mollie..). You’ll find the full list in the documentation. If you need a method not in that list you can create your own module. After installing (or building) a regular payment module for magento2 you will do these steps:
- Create a repository in any code hosting service (Github, Bitbucket, GitLab..)
- Include your repository in the React app
package.json
"config": {
    "paymentMethodsRepo": {
        "myPayment": "git@github.com:hyva-themes/magento2-hyva-checkout-my-payment.git"
    }
},
- When you run
npm install, the method will be automatically downloaded in thepaymentMethodsfolder and added to thecustomRendererers.js, that is a generated files that looks like that:
import paypalExpressRenderers from './paypalExpress/renderers';
import payoneRenderers from './payone/renderers';
import myPaymentRenderers from './my-payment/renderers'; // This is our custom module

export default {
...paypalExpressRenderers,
...payoneRenderers,
...myPaymentRenderers
};
- The structure of a payment method for Hyvä React Checkout looks as follows:
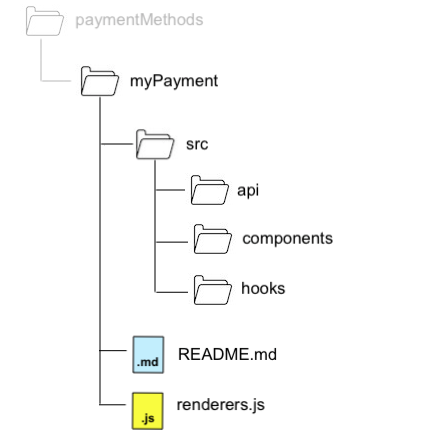
- In renderers.js include all components that should override the default component. Usually it’s just one, but they can be more than one if there are multiple methods (That’s the case of PayOne for example).
import myPayment from './src/components/myPayment';

export default {
   myPayment: myPayment
};
renderers.js
- In
./src/components/myPayment.jsxyou will create your own component that will replace the default one. It includes a radio button, and a custom part. Note that you don’t need to do anything to replace the default radio button with the custom one, if a custom renderer exists for a payment method, it will be used automatically. This is a minimum example of a custom renderer:
import React, { useEffect } from 'react';
import _get from 'lodash.get';
import { func, shape, string } from 'prop-types';
import RadioInput from '@hyva/react-checkout/components/common/Form/RadioInput';
import usePaymentMethodCartContext
   from '@hyva/react-checkout/components/paymentMethod/hooks/usePaymentMethodCartContext';

function myPayment({ method, selected, actions }) {
  const methodCode = _get(method, 'code');
  const isSelected = methodCode === selected.code;
  const { setPaymentMethod } = usePaymentMethodCartContext();

  // When the method is selected, add it to the quote
  useEffect(() => {
    if (isSelected) {
      (async () => {
        await setPaymentMethod(methodCode);
      })();
    }
  }, [
    setPaymentMethod,
    methodCode,
    setPageLoader,
  ]);

  return (
    <div>
       <RadioInput
           label={_get(method, 'title')}
           name="paymentMethod"
           value={_get(method, 'code')}
           onChange={actions.change}
           checked={isSelected}
       />
       {isSelected && (
            <div>
               Here you can add a form to collect customer data,
               inject an iFrame or whatever you need.
            </div>
       )}
    </div>
  );
}

const methodShape = shape({
  title: string,
  code: string.isRequired,
});

myPayment.propTypes = {
  method: methodShape.isRequired,
  selected: methodShape.isRequired,
  actions: shape({ change: func }),
};

export default myPayment;
myPayment.jsx
- Below the radio button is a div that is only displayed when the method has been selected. Add your custom interface there (a form, an iframe, a button or even just some instructions)
- Add other Effect Hooks for any custom behavior you need
- You will probably also want to replace the “place order” with a custom action, perhaps a redirect to an external client or opening a modal. In this case we will have to register a custom action inside our customRenderer.
function myPayment({ method, selected, actions }) {
  const { registerPaymentAction } = useCheckoutFormContext();
  ...
  useEffect(() => {
    registerPaymentAction('myPayment', customPaymentSubmitHandler);
  }, [registerPaymentAction, customPaymentSubmitHandler]);
  ...
}
myPayment.jsx
- Create your own
customPaymentSubmitHandler, that is the custom function that will be called when the customer will click on “place order”. - The api folder contains all your custom rest and grapQL custom call
- The hook folder contains all your custom hooks.
What if I have a step checkout? This will be another post. That’s all for today.